Saturday, February 28, 2015

Shattered Star: Gnome Baseball!

Game Date: 2/28/2015
Location: The Game Keep
Campaign: Shattered Star, Session 17
System: D&D 5e
DM: Rusty

The Party:
Bjertha (Matt) - Dwarf Fighter
Carlie Nackle (Chere) - Gnome Wizard
Maruca (Daniel) - Human Ranger /Cleric/Rogue
Shemus (Cliff) - Elf Ranger
Slancio Brioso (Thomas) - Human Bard

The Session:
Today we started out resting on the beach, recovering from last session's epic fight with a statue.  After a long rest, we tried the nearby door and peeked into the next room. On the walls were murals depicting wanton acts between otherworldly beings and the Runelord Sorshen (whose body is now a party member named Tai, having changed her name after Sa'oa's mind took over Sorshen's body.  Confused yet?)  The murals were signed by an artist named Amivadeus Yasrin. 

Around the next corner was a gate.  Maruca picked the lock and we entered the next room.  A crimson-clad man approached and asked us for a password.  We quickly pointed out that his master Sorshen was with us, and he grudgingly let us pass.  In the next room we found a few more statues of Sorshen, but one was missing a head.  Two other statues' heads suddenly came off and grew legs.  We soon found ourselves in battle with a pair of sentinels.

Once they were destroyed, we saw another statue around the next corner.  We took a preemptive strike on this one, and killed it in a couple of rounds.  Through the next hall we saw more dirty murals.  Meruca, Slancio and Bjertha triggered a pit trap, but only Bjertha failed her save and fell.  She managed to land between the spikes, and didn't take much damage.

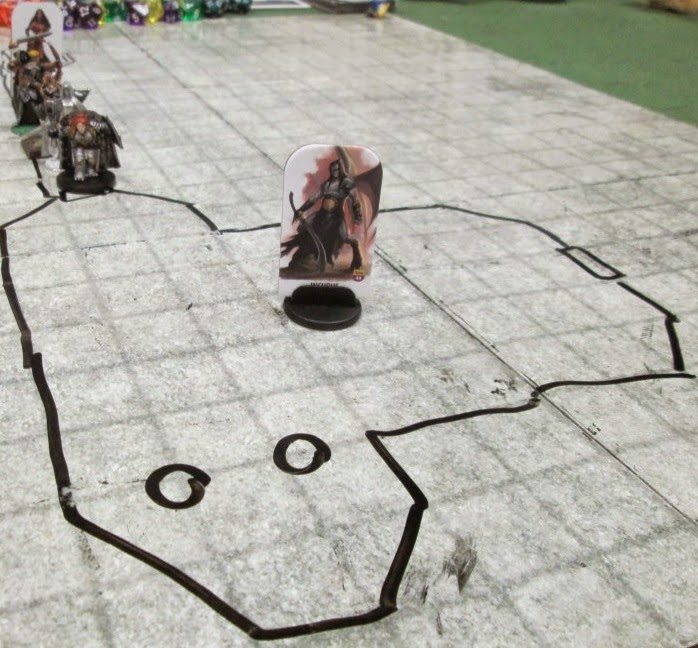
We spent a while figuring out how to get the party across the 15-foot long pit.  We did lots of tricks with ropes and pitons, some climbed across, others jumped.  Bjertha performed a Fastball Special on Carlie, easily tossing her across the pit.  Once we were all across, we made our way down the narrow hallway until we reached a door.  We kicked the door in, and saw a chanting Incubus.

The Incubus started out by trying to charm Bjertha, but failed.  We ganged up on the creature, and after a couple of rounds he vanished.  When he reappeared, he proclaimed, "If nothing else, the imposter must die!" and attacked Tai.  Bjertha finished the Incubus off with a double crit.

The next room was very warm.  It was a large room, with a two-tiered raised area in the middle.  In the center of the highest platform, a gray flame burned.  There were two side chambers, one of which had a set of doors.  On another wall there was an obvious secret passage - a dull gray section of wall next to an unlit torch.  Meruca got the idea to light the torch from the gray flame. 

When she touched the torch to the flame, four animated balls of fire jumped out of the flame and attacked us.  While we fought the fireballs - actually Cacodaemons - Maruca put the torch back on the sconce, and the secret door opened.  Carlie used a Shatter spell to damage all four fireballs, and it didn't take long to finish them off.

Note I had to leave the session early, but here's what I'm told happened next, courtesy of Rusty:

Shemus impetuously opened the doors to the west.  They found a hallway with ten doors; five on the south wall, and five on the north wall.  All but one of them said the same thing, translated from Thassilionian by Jasper: "Thou wouldst enter? Then thou must touch!"  The remaining door, the closest on the north wall, was covered with frost.  It said, "Thou wouldst enter to enjoy the company of the Runelord of Lust herself? Then thou must touch!"  So Shemus touched it.   Shemus, Slancio, and Carlie received a large amount of Cold damage.  The rest of the rooms were luxurious bedrooms.  Maruca and Slancio helped themselves to the sheets.  Shemus found a secret door in the west wall, which led to an even more luxurious bedroom, complete with a 10 x 15 ft bed.  Leaving that room, they found another room with benches and a starburst pattern on the floor that detected as magical. The group decided to back out of the room at that point.
 
Going back to the flame room, the door had shut again.  Bjertha lit the torch again, with no ill effects. They then spent several minutes trying to figure out how to shut the door again, and how to open it from the other side.  Eventually, Shemus had put the torch out, and went back up to the flame to light it again.  The Cacodaemons reappeared, showing a new ability, flame breath.  One breathed on Shemus, but he escaped the worst of it.  Another got Bjertha, Maruca, Tai, Carlie, and Jasper.  Jasper got dropped.  No sooner had he been brought up when another one breathed again, killing Jasper outright.  Shemus was dropped again before they were all dealt with. 
 
Finally going down the stairs, they came upon a large lascivious painting of Sorshen, arms outstretched in a welcoming embrace, lips twisted in a faintly cruel smile.  A phrase in a foreign tongue was inscribed in gold across the top of the mural.  The feet of the mural showed wear.  Slancio used his comprehend languages to get, "Prostrate thyself and demonstrate proper devotion, my sweet slave, if you wish to enter my domain."  Maruca, Slancio, Shemus, Carlie, Tai, and Bjertha kissed the feet and vanished in order.  That's where we stopped for the night. 

Saturday, February 14, 2015

Shattered Star: Looking For Lust In All The Wrong Places

Game Date: 2/14/2015
Location: The Game Keep
Campaign: Shattered Star, Session 16
System: D&D 5e
DM: Rusty

The Party:
Bjertha Brawlbaker (Matt) - Dwarf Fighter
Maruca (Daniel) - Human Ranger/Cleric/Rogue
Sa'oa (Angela) - Elf Monk/Warlock
Shemus (Cliff) - Elf Ranger

The Session:
We're still looking for the Shard of Lust.  Last session we finally approached the lighthouse called the Lady's Light, and we started exploring some Bullywug-infested tunnels.  Today we continued searching those caverns.  Around one corner we found a room filled with mud.  We were soon attacked by three giant frogs and their bullywug master.

Sa'oa and Meruca were hit by the bullywug's fear power.  One of the frogs grappled and restrained Bjertha, who took a lot of damage over the course of the fight.  Fearing for the safety of our tank, Sa'oa finished the boss off with a Sleep spell, allowing Meruca to perform a coup de grace.  After the battle, we looked around the room.  We found two glass jars, filled with some sort of weird bug-repellant substance.  We took the jars with us and kept on going.

Sa'oa scouted ahead and brought us back news of the next chamber.  It was infested with insect creatures.  Most of them were just bug-sized, but there were three huge Albino Cave Solifugids on the walls.  While Sa'oa was hoping to ask them for directions, Bjertha rushed in and attacked the only one she could reach.  Maruca set the insecticide jars on the ground and removed the lids, and threw them on the Solifugids that ventured too close.  It was SUPER EFFECTIVE and by the end of the battle, all three insects were unconscious.  We tied them up and tried talking to them.  Unfortunately they didn't understand us.

There were three more exits from the room.   Sa'oa scouted one, which eventually led to a hydra.  It saw Sa'oa, but luckily it couldn't fit through the tunnel.  She sauntered back to the main chamber.  The next tunnel didn't go anywhere interesting, but the final tunnel led to a square room with a pit in the center.  There were several statue-shaped columns surrounding the pit, four of which came to life while we were examining the pit.

This fight was difficult because attacking them could potentially break ours weapon.  We discovered this when Sa'oa hurt her hands with some unarmed strikes.  Not wanting to do any more punching, she pushed one of the statues into the pit.  Rather than seeing it fall all the way down, it vanished after about 10 feet.  Jasper and Slancio both broke their weapons attacking enemies, but luckily the fight didn't last much longer, and they were able to fix their weapons with a mending spell.

Now that we were safe, we examined the pit.  We experimented with dropping various objects into it.  Everything disappeared about 10 feet down.  Sa'oa and Shemus secured some ropes and climbed down.  Once they entered the dark area, they found they couldn't speak.  As they got closer to the bottom, they saw the statue Sa'oa had pushed.  It was still fine and tried to attack her.  Unable to use vocal spells, she fired an arrow at it.  The arrow flew too slowly to do much damage.

They climbed back up, experimented a bit more, and realized that inside the pit was a zone of darkness, silence, and feather fall.  Sa'oa climbed back down, got low enough to be out of the zone, and used Eldritch Blast on the statue.  It jumped up and grabbed the rope.  Sa'oa cut the rope beneath her, dropping the statue.  The statue picked up a magically-lit stone our party had dropped earlier, and threw it at Sa'oa.  Sa'oa finished off the statue with Eldrich Blast.

She came back up and convinced us to follow her to the bottom of the pit.  At the bottom, there was a room with several statues and a a sarcophagus.  Bjertha and Sa'oa worked together to remove the lid, revealing a body.  The body was of a beautiful woman, who looked just like the statues around the room.  She didn't look dead, so we nudged her.  Suddenly Sa'oa was stricken with images of her estranged family, and took a huge amount of psychic damage.  Bjertha pulled her away from the sarcophagus and tried to help her.

Every time we healed Sa'oa, she took more psychic damage on the next round.  Maruca and Shemus tried doing various things to the woman in the sarcophagus, like stabbing her or removing her jewelry.  Nothing we did broke the psychic connection, and Sa'oa soon died.  Then the woman in the sarcophagus opened her eyes, sat up, and looked around.  She told us to let go of her body, meaning Sa'oa's.  We soon realized that Sa'oa's mind was in this new body.

The woman Sa'oa now possessed was human, with purple eyes and long black hair.  She turned out to be the Runelord Sorshen, who Maroux had told us about last session.  Or at least she used to be.  Now, she's Sa'oa.  We agreed to take Sa'oa's old body back to the surface when we're done down here.  We kept looking around.

There were two tunnels to choose from.  One dead-ended at an underground river.  The other one led to a door, which opened after Sa'oa pressed some panels on the wall.  The doorway led to a beach on the same river, with two skiffs tied up.  After a little bit of reconnaissance, we all took the skiffs down the river into a large open room.  There was another beach along one wall, and there was a seven-sided island in the middle of the room.  On the island was a large glass statue of Sorshen.

We tried casting detect magic on the statue, which came to life and attacked us.  This was a long, difficult battle.  We discovered early on that most of our weapons could not hurt it, giving some of us little to do in the fight.  Those of us who couldn't damage it played support for those that could, providing healing potions to those who needed it. At one point Carlie fired off a Shatter spell, which wasn't as effective as we'd hoped it would be.

Eldrich Blast hurt it some, Thunderwave spells also worked, and Slancio's sword worked pretty well.  When Slancio finally went down, Shemus grabbed his sword while the bard recovered.  Shemus dealt the final blow, bringing the statue down.  We ended the session there.  We each got 500 xp for the session, bringing a couple of us up to level 5 (as soon as we get a chance to take an extended rest).

Sunday, February 8, 2015

Shattered Star: The Most Dangerous Soup

Game Date: 2/7/2015
Location: The Game Keep
Campaign: Shattered Star, Session 15
System: D&D 5e
DM: Rusty

The Party:
Bjertha Brawlbaker (Matt) - Dwarf Fighter
Carlie Nackle (Chere) - Gnome Wizard
Maruca (Daniel) - Human Ranger/Cleric/Rogue
Sa'oa (Angela) - Elf Monk/Warlock
Shemus (Cliff) - Elf Ranger
Slancio Brioso (Thomas) - Human Bard

The Session:
Last session we nearly finished our trek through the swamps, looking for a lighthouse called the Lady's Light, home of the next shard of the Shattered Star.  As we resumed our journey today, we found the remains of an ancient battlefield.  We searched the area, and saw a suit of armor and a helmet floating towards us.  Not knowing if it was friend or foe, we waited for it to attack first.  Which of course it did.  We took out the helmet quickly, but it rejoined the battle as a floating skull.  It still didn't take long to finish off.  The armor itself had a lot of hit points, so it took a bit longer to defeat.

During the battle Jasper got confused, and kept trying to attack Bjertha.  Maruca nearly died, failing two death saves before we finished off the armor and healed her.  After the battle, we took a short rest and explored the area.  We found about 600 gp worth of muddy gold trinkets.  Note, the armor was an Invisible Stalker, and the helmet was a Wisp.  We received 550 xp for the encounter.

Our guide Jasper led us to a small island, on which sat a small hut.  We greeted the owner of the hut, Maroux the swamp witch.  She was an old half-orc with one eye glazed over.  We asked her for any information she could give us about the Lady's Light.  She offered to help us, but gave us a task first.  She was in the mood to make some soup, and for that she needed some seaweed called Kelpie's Hair.  She told us to go to a nearby shipwreck, where the seaweed grew in abundance.  Being genre savvy, we used a scroll of Water Breathing before attempting the deed.

We swam towards the shipwreck, and Carlie began using Mage Hand to pick some seaweed.  Seven undead pirates emerged from the ship, led by their captain.  It reminded us of an iconic scene from Pirates of the Caribbean.  The pirates didn't take a lot of hits to kill, but the captain was pretty tough.  We took them out one at a time.  Carlie killed the captain with a Thunderwave, and Slancio finished off the final pirate skeleton.  We looted the captain's weapon, a nifty-looking +1 rapier with scale hilt and a blade made of coral.  It glows with an enchantment that keeps it clean, and inspires the wielder with great confidence.  We let Slancio keep the rapier.  We received 175 xp for the encounter.

We went back to Maroux's hut and had some stew.  While Bjertha found it to be quite tasty, Slancio and Shemus had trouble keeping it down.  We stayed the night, and Maroux drew us a crude map, and gave us some info about the Lady's Light.  Apparently some knights came through recently, led by a woman named Oriana.  They were also on a mission to loot the lighthouse.  They took advantage of the rivalry between the local bullywugs and trogs, pitting them against each other and using them to take control the lighthouse.  Maroux doesn't know how that turned out, so who knows if what we'll face once inside.

We set out.  We passed through the Trog area, thinking maybe we could befriend them.  However, the Trogs had been so badly defeated that we couldn't even get a response from them.  We kept going until we reached the bullywug village.  Since we knew Oriana's knights were female, and our party was fairly female-heavy, we concocted a plan.  We disguised our male members as slaves, and hoped to convince the bullywugs that we were there to join with Oriana.

The name dropping didn't work.  As we reached they bullywug huts, we tried to communicate with them but just got blank stares.  They regarded us warily as we walked the long way around their village, blocking entry but taking no hostile actions.  We gave the village a wide berth and kept going until we reached a cave.

Inside the cave we saw a large carving of a multi-headed frog demon.  Four bullywugs were crouched around a pile of colored stones.  They threw javelins at us as we approached.  It was a pathetically easy battle.  The bullywugs wound up at the bottom of the initiative, and we nearly wiped them out before they even had a turn. 

After the fight we looked at the stones they'd been protecting, and found a lot of copper, silver, gold, bloodstones, agates, garnets, and a platinum necklace.  This fight netted us 33 xp.  We ended the session there.